Bodies and the browser
A body is one solid piece of the model: the thing you would hold in your hand once it is printed. Sketches and construction geometry are not bodies, and neither is a fillet or a hole. Those change a body that is already there.
When a feature makes a body
Features that build material start one when they have nothing to join: Extrude, Revolve, Sweep, Loft, Coil and the primitives (Box, Cylinder, Sphere, Torus). An imported STEP or mesh file makes one body per solid in it. Their Operation decides what happens when the new material meets an existing body: New body, Join, Cut or Intersect. Extrudo proposes one from where you started, as described in features and the timeline.
Features that change a body keep it as it is: Fillet, Chamfer, Shell, Hole and Thread edit the bodies they touch.
Two things can turn one body into several. A cut that severs a part gives you one body per piece. Split Body does it on purpose. In both cases the largest piece keeps the original body's name, colour and place in the browser, and the others get the next free names.
Names are Body1, Body2 and so on, in the order the bodies first appeared, and a number is
never reused, even after you delete the body. Rename them to something you will recognise;
the names go into the files you export.
The browser
The browser is the panel at the left of the view. Each folder has a small eye in its header that hides or shows everything in it, and a right-click menu with Collapse and Hide all (the Bodies folder's also has Export all bodies…).
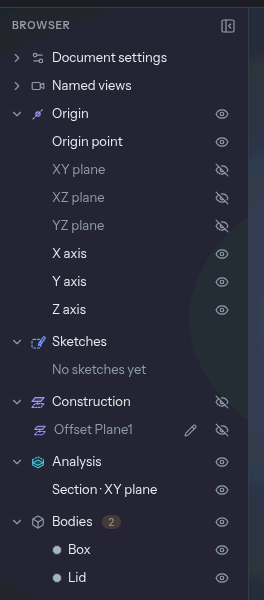
- Origin holds the origin point, the three origin planes and the three axes. The planes start hidden. The eye shows them in the view.
- Sketches lists every sketch. A sketch that a feature has used is hidden, and the eye shows it again.
- Construction lists the planes, axes and points you made with the Construct tab.
- Bodies lists the bodies, with the number of them on the folder.
- Analysis appears only while you have a section, overhang or wall-thickness check running, and gives each its own eye. See getting it printed.
- Canvases appears when the design has a Canvas picture.
Two more folders, Document settings and Named views, sit collapsed at the top. The first
shows the design's unit. Named views lists the views saved from the navigation bar's Named
views menu (see moving the view): a click on a row restores it, and its
right-click menu has Restore, Update to Current View, Rename (F2) and Delete.
While a design opens, the Bodies folder shows the bodies the last session made as faint rows and the view says "Preparing your design…". They turn solid when the model has been computed.
Working with a body
A click on a row selects the body. Shift-click adds more, and the selection works as it does
in the view: a tool you start next has the bodies already filled in. Selecting from the row is
the easiest way to pick a body that is hidden inside another one.
Right-click a row, or press F2 on it, to reach:
- Rename (
F2). - Show Body, Show as Ghost or Hide Body, the states the body is not in (the same as the eye). A ghost is a grey see-through shape that takes no part in picking, Fit or the print checks — handy to keep a body in sight without having it in the way. A hidden body is not drawn at all, and the print checks leave it out.
- Appearance…, a panel with nine swatches (Default, Blue, Teal, Green, Amber, Coral, Pink, Violet, White, Charcoal) and a field for any hex colour, plus an opacity of Opaque, 75 %, 50 % or 25 %. Opacity helps when you want to see a body inside another. Both are stored with the body in the design.
- Export…, which opens Export Model with the body ticked.
- Delete (
Del). Deleting adds a step to the timeline rather than erasing anything, soCtrl+Zbrings the body back.
A body row's eye steps through shown → ghost → hidden and back, so one click is always the next faintness; the folder's eye above them still just shows or hides every body.
A colour you give a body goes into a 3MF or STEP file when you export it. A body imported from a STEP file that names a colour starts with that colour.
Working with several bodies
These tools are in the Transform group of the Modify tab. Select the bodies first and they fill in.
- Combine joins, cuts or intersects. The first body is the Target and the rest are the Tools. The tools are used up unless you tick Keep tools. Use it to make two bodies one, or to cut a shape out of another.
- Move/Copy (
M) moves and turns bodies: free, about an axis, or point to point, with arrows and rings in the view. Create copy leaves the original. - Mirror reflects bodies about a plane or a flat face. It makes a copy by default, and Join fuses the copy and the original.
- Split Body cuts bodies along a plane or flat face. Keep says whether you want both sides or one.
- Scale enlarges or shrinks about a point, by one factor or one per axis.
Mesh bodies
A mesh file (STL, 3MF, OBJ) or an OpenSCAD file comes in as a mesh body, tagged Mesh in the browser. It is a net of triangles, not a set of exact surfaces, so it has one face and no edges you can pick. The creases where the triangles bend sharply are drawn but cannot be selected.
What works on a mesh body: moving, mirroring, scaling, splitting, measuring, exporting as STL or 3MF, and joining or cutting with other bodies. Cutting a solid with a mesh, or the other way round, makes a mesh body of the result, and Extrudo warns you when a solid turns into one.
What does not: anything that needs an exact face or edge. Fillet, Chamfer, Shell, Thread, Draft, Hole, Place on Bed and Rib stop with a message that names the operation. A STEP file cannot hold a mesh, so the Export Model dialog disables mesh bodies when STEP is chosen.
A mesh has to be closed (watertight) to import. If it is not, Extrudo says how many edges are open and suggests repairing it in your slicer first. Where two parts touch along an edge or at a corner — an STL of patterned arms that meet a hub, say — Extrudo separates them itself and says how many edges it split, so they come in as separate bodies that still touch.